Your first sign-in
Accept an invitation, sign in, recover a password and find your way around the console.
This page covers getting into the console for the first time and recognising what you see once you are in.
Accept your invitation
An administrator invites you by email. The email contains a link that opens the invitation page.
- If you do not have an Optima account yet, the page is titled Create your account. Enter your First name and Last name, choose a Password and type it again under Confirm password, then select Create account & join. The invitation link itself verifies your email address, so there is no separate verification step.
- If you already have an account, the page tells you which environment you are joining and which roles you will receive. Select Accept invitation.
- After joining, sign in to continue.
Passwords need at least 8 characters and at most 72 bytes (72 characters of plain English text; fewer with accented letters or emoji). If the page says The invitation is invalid or has expired, ask the administrator to send a new invitation.
If you register by other means, you may receive an email asking you to verify your address. The link opens a page that says Email verified and offers Go to sign in. A link that is invalid, expired or already used shows Verification failed. If you have already verified, just sign in.
Sign in
Open the console address your administrator gave you. The sign-in page is titled Sign in to Optima.
- Enter your Email and Password.
- Select Sign in.
If the address is not a valid email address, the page asks you to enter one. If the details are wrong you see Sign-in failed with Invalid email or password. The page says that an account is locked, disabled or not yet verified only after the correct password was entered; a wrong password always gets the same message, so you cannot tell whether an address has an account. If the console cannot reach the server it says so; try again in a moment.
An account that is locked or disabled by an administrator cannot sign in until an administrator changes it.
Change a password someone else chose
If an administrator created your account and gave you a password, or you are the instance administrator and the setup tool generated your password, the console asks you to choose a new password right after you sign in. Until you do, nothing else opens: you can only change the password or sign out.
Enter the password you were given as the current password, then a new password of at least 8 characters that is different from it. A wrong current password counts as a failed sign-in, and five in a row lock the account for 15 minutes. After the change your other sessions end, and you continue in the console with the new password. If you no longer know the password you were given, sign out and use Forgot password? below; a reset also lifts the requirement.
Change your password at any time
Open the user menu at the top right and select Change password. Enter your current password and a new one. Your other sessions are signed out.
Forgot your password
- On the sign-in page select Forgot password?.
- Enter your email address and select Send reset link.
- Open the email. The link is valid for one hour. The page confirms that if the address has an account, a link is on its way, whether or not the address is registered.
- On the Choose a new password page, enter a New password of at least 8 characters, confirm it, and select Set new password.
Resetting a password ends your sessions on other devices. A link that is no longer valid says so and lets you ask for a new one. Any other failure, such as too many attempts, keeps you on the form and says why; try again shortly.
Find your way around
After signing in you land on Home.
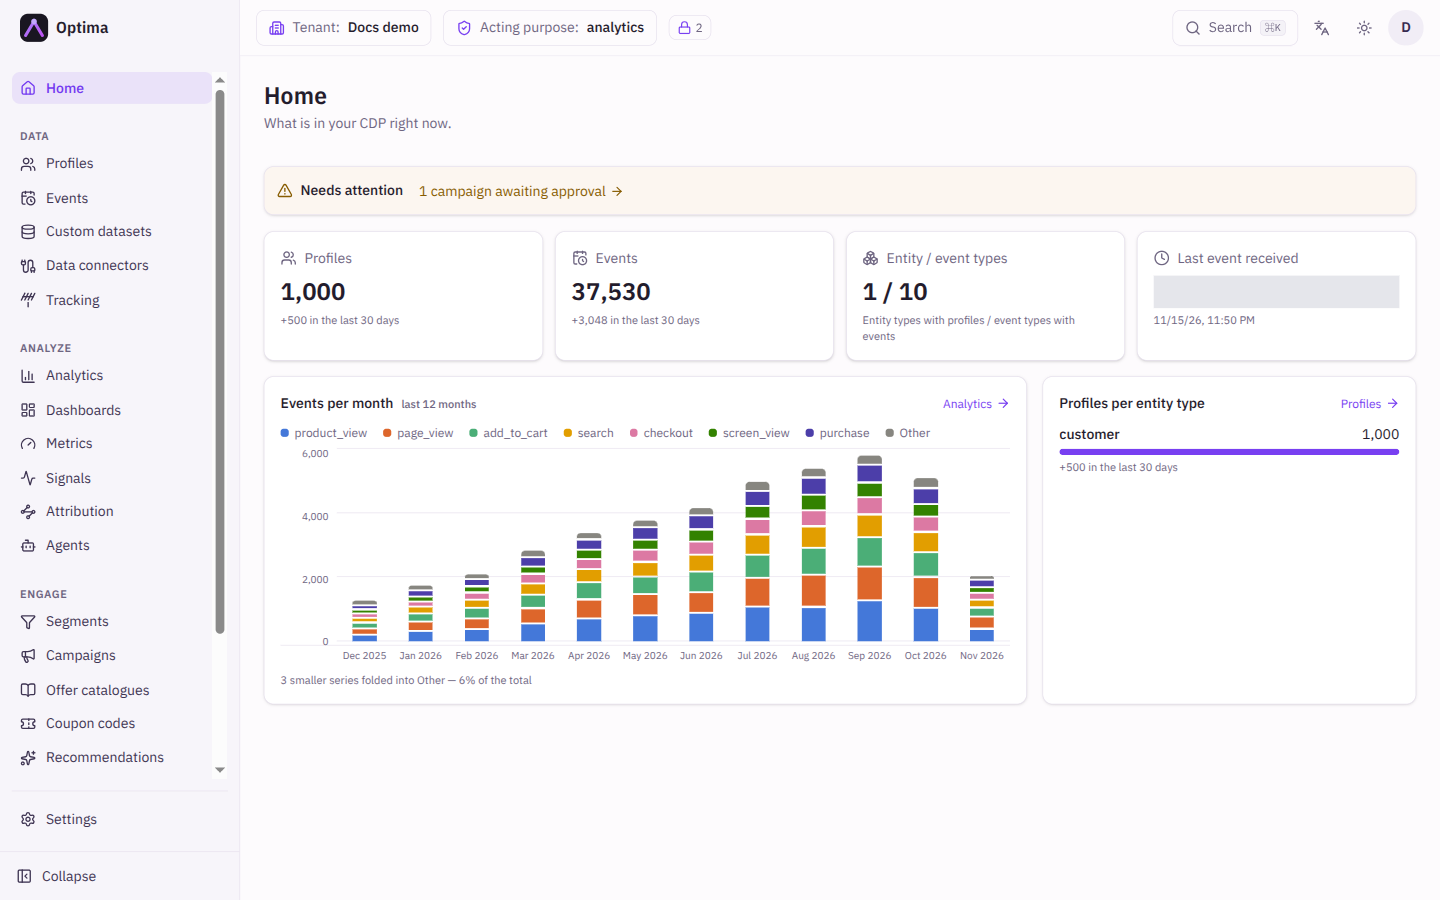
Home shows what is in your customer data platform right now: the number of profiles and events, how many are new in recent days, when the last event arrived, events per month and profiles per entity type. If a dashboard is pinned as your home dashboard, you see that instead, with an Overview link back.
A Needs attention panel lists work waiting for you: campaigns or content awaiting approval, metric alerts, pending erasure requests, failed connector runs and a profiles, events or connectors quota close to its limit. It shows only what your roles let you act on. When nothing is waiting it says Nothing needs your attention right now.
On a new environment where nothing has been ingested yet, Home shows Getting started with four steps: Define entities and event types, Connect a data source, Set up web/app tracking and Build a dashboard.
The navigation rail
The rail on the left groups the daily work into three questions:
| Group | Question | Typical screens |
|---|---|---|
| Data | What do we know? | Profiles, Events, Custom datasets, Data connectors, Tracking |
| Analyze | What does it tell us? | Analytics, Dashboards, Metrics, Signals, Attribution |
| Engage | What do we do about it? | Segments, Campaigns, Offer catalogues, Coupon codes, Recommendations, Templates & content, On-site, Activation, Contact policies, Change log |
Home sits above the groups. Settings sits at the bottom of the rail and opens the screens you use at set-up time and occasionally afterwards: your account, the schema, identity, privacy, notifications, languages, usage, team, API keys, roles, channels, external systems, private networks and AI models.
You only see the screens your roles and your organisation's licence allow. If something described in these pages is missing from your rail, see licences and roles.
The top bar
The top bar carries the controls that apply everywhere:
- Search (also Ctrl+K or Cmd+K) finds screens, campaigns, segments and templates.
- Tenant shows which environment you are working in and lets you Switch tenant. A Sends suppressed badge marks an environment whose outbound mode is off or sink: messages are built and recorded, but nothing reaches real people. If the backend does not report the mode, a Sandbox or Development badge marks the same thing.
- Acting purpose declares why you are looking at customer data. It decides which personal fields you can see, and it is recorded in the audit log. In an environment in strict mode, customer data is shown only under a declared purpose; until you pick one, a Choose an acting purpose notice replaces the data instead of an empty or hidden section. See consent and purposes.
- Your PII access level shows how sensitive the fields you may see can be.
- Help, the Language and Theme menus, and the Account menu with Sign out.
Next step
Send your first message: Your first campaign.
For a reading path matched to your job, see Start here. For every screen in detail, see the Console pages.